This topic was designed to guide you through the steps required to build a typical databound grid. Each step will provide you with information on how to accomplish a specific task using both code and the Grid Designer to get you up and running efficiently.
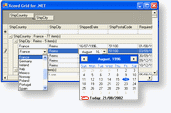
For the purposes of this example we will be using a dataset created using the OleDbDataAdapter class which contains the Orders table from the Northwind database.
Building a databound grid
- Install Xceed Grid for WinForms and add it to your project. Don't forget to license the grid!
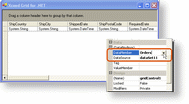
- Bind the grid to a dataset, or any other supported data source, by setting the grid's DataSource and DataMember properties.
Because we will be doing batch modifications to the grid, the DataSource and DataMember properties (as well as other properties and events ) should be set between calls to the grid's BeginInit and EndInit methods.
Make sure that you fill your datasets before binding the grid!
To provide data manually to the grid (unbound) jump to the Building an unbound grid tutorial.
See code
VB.NET Copy CodeGridControl1.BeginInit() ' EndInit will be called later GridControl1.DataSource = DataSet11 GridControl1.DataMember = "Orders"
C# Copy CodegridControl1.BeginInit(); // EndInit will be called later gridControl1.DataSource = dataSet11; gridControl1.DataMember = "Orders";
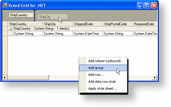
- Create the desired groups (if needed) and add them to the grid. These groups will act as templates when creating the runtime groups. When using the Grid Designer, groups can be added using either the GroupByRow or the Add group verb or menu item. The menu is accessible by right-clicking on the body of the grid or on a group.
The code below demonstrates the 2 ways in which groups can be created and added to the grid's collection of group templates:
See code
VB.NET Copy CodeDim group As New Group() group.GroupBy = "ShipCountry" group.HeaderRows.Add( New GroupManagerRow() ) GridControl1.GroupTemplates.Add( group ) GridControl1.GroupTemplates.Add( New Group( "ShipCity" ) )
C# Copy CodeGroup group = new Group(); group.GroupBy = "ShipCountry"; group.HeaderRows.Add( new GroupManagerRow() ); gridControl1.GroupTemplates.Add( group ); gridControl1.GroupTemplates.Add( new Group( "ShipCity" ) );
Using the Grid Designer, you can create groups by dragging a column header into the GroupByRow or right-clicking on the Add group verb or menu item.
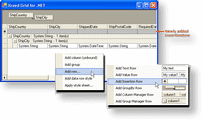
- Add any specialized rows you want to the grid and group templates. When using the Grid Designer, rows can be added by right clicking on any element in the grid and selecting the Add row... or Insert row... menu. It is also possible to add rows using the verbs in the property grid.
Xceed Grid for WinForms provides a wide variety of rows which can be used to display information such as labels, manage other rows in the grid, insert new data rows, etc.
See code
VB.NET Copy CodeGridControl1.FixedHeaderRows.Add( New InsertionRow() )C# Copy CodegridControl1.FixedHeaderRows.Add( new InsertionRow() );
- Handle the ValidationError event for each cell in the data row template. It is suggested that this event be handled since, by default, no exceptions will be thrown by Xceed Grid for WinForms if an invalid value is entered into a cell.
It is also recommended that you handle the ValidationError event on the data row template and the InsertionRow (if you are using one in your grid).
See code
VB.NET Copy CodeDim cell As DataCell For Each cell In GridControl1.DataRowTemplate.Cells AddHandler cell.ValidationError, AddressOf Me.cells_ValidationError Next cell Private Sub cells_ValidationError( ByVal sender As Object, ByVal e As CellValidationErrorEventArgs ) MessageBox.Show( e.Value.ToString() + " is not a valid value for " + _ CType( sender, DataCell ).FieldName ) e.CancelEdit = False End Sub
C# Copy Codeforeach( DataCell cell in gridControl1.DataRowTemplate.Cells ) { cell.ValidationError += new CellValidationErrorEventHandler( this.cells_ValidationError ); } private void cells_ValidationError( object sender, CellValidationErrorEventArgs e ) { MessageBox.Show( e.Value.ToString() + " is not a valid value for " + ( ( DataCell )sender ).FieldName ); e.CancelEdit = false; }
To select each cell in the data row template, hold the shift key while clicking on the cells.
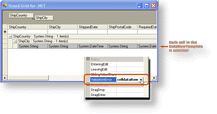
- Customize the editors and viewers that will be used to edit and view the content of each cell. This process must be done via code.
Default cell editor and viewers will be assigned to each column in the grid depending on the column's data type.
See code
VB.NET Copy CodeDim editor As New Xceed.Grid.Editors.ComboBoxEditor() Dim row As Xceed.Grid.DataRow For Each row In GridControl1.DataRows If Not editor.Items.Contains( row.Cells( "ShipCountry" ).Value ) Then editor.Items.Add( row.Cells( "ShipCountry" ).Value ) End If Next row gridControl1.Columns( "ShipCountry" ).CellEditorManager = editor
C# Copy CodeXceed.Grid.Editors.ComboBoxEditor editor = new Xceed.Grid.Editors.ComboBoxEditor(); foreach( Xceed.Grid.DataRow row in gridControl1.DataRows ) { if( !editor.Items.Contains( row.Cells[ "ShipCountry" ].Value ) ) editor.Items.Add( row.Cells[ "ShipCountry" ].Value ); } gridControl1.Columns[ "ShipCountry" ].CellEditorManager = editor;
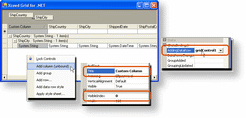
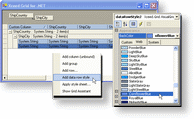
- Add unbound columns (if desired) in order to provide custom data. This is done by right-clicking in the body of the grid or by selecting a column and using the Add column (unbound) or Insert column (unbound) menu. The data is then provided via the grid's AddingDataRow event.
By default, the unbound column will have a System.String data type. To change the column's data type, the DataType property must be set.
See code
VB.NET Copy CodeDim column As New Column( "Custom Column", GetType( string ) ) GridControl1.Columns.Insert( 0, column )
C# Copy CodeColumn column = new Column( "Custom Column", typeof( string ) ); gridControl1.Columns.Insert( 0, column );
See code
| VB.NET |
Copy Code |
|---|---|
AddHandler GridControl1.AddingDataRow, AddressOf Me.gridControl1_AddingDataRow Private Sub gridControl1_AddingDataRow(ByVal sender As Object, _ ByVal e As Xceed.Grid.AddingDataRowEventArgs ) Try If e.DataRow.Cells( "ShipCountry" ).Value.ToString() = "Canada" Or _ e.DataRow.Cells( "ShipCountry" ).Value.ToString() = "USA" Or _ e.DataRow.Cells( "ShipCountry" ).Value.ToString() = "Mexico" Then e.DataRow.Cells( "Custom Column" ).Value = "North America" Else e.DataRow.Cells( "Custom Column" ).Value = "Other" End If Catch exception As Exception MessageBox.Show( exception.ToString() ) End Try End Sub | |
| C# |
Copy Code |
|---|---|
gridControl1.AddingDataRow += new AddingDataRowEventHandler( this.gridControl1_AddingDataRow ); private void gridControl1_AddingDataRow(object sender, Xceed.Grid.AddingDataRowEventArgs e) { try { if( e.DataRow.Cells[ "ShipCountry" ].Value.ToString() == "Canada" || e.DataRow.Cells[ "ShipCountry" ].Value.ToString() == "USA" || e.DataRow.Cells[ "ShipCountry" ].Value.ToString() == "Mexico" ) { e.DataRow.Cells[ "Custom Column" ].Value = "North America"; } else { e.DataRow.Cells[ "Custom Column" ].Value = "Other"; } } catch( Exception exception ) { MessageBox.Show( exception.ToString() ); } } | |
8. Finally, the overall appearance of the grid as well as the appearance of each element in the grid can be modified using either stylesheets or via each grid element's properties.
You can select each element in the grid to personally customize its appearance...
See code
| VB.NET |
Copy Code |
|---|---|
CType( GridControl1.FixedHeaderRows( 1 ), ColumnManagerRow ).BackColor = Color.Blue | |
| C# |
Copy Code |
|---|---|
( ( ColumnManagerRow )gridControl1.FixedHeaderRows[ 1 ] ).BackColor = Color.Blue; | |

Alternate the appearance of the data rows using datarow templates styles...
See code
| VB.NET |
Copy Code |
|---|---|
Dim style1 As New VisualGridElementStyle() style1.BackColor = Color.LightBlue Dim style2 As New VisualGridElementStyle() style2.BackColor = Color.DarkBlue GridControl1.DataRowTemplateStyles.Add( style1 ) GridControl1.DataRowTemplateStyles.Add( style2 ) | |
| C# |
Copy Code |
|---|---|
VisualGridElementStyle style1 = new VisualGridElementStyle(); style1.BackColor = Color.LightBlue; VisualGridElementStyle style2 = new VisualGridElementStyle(); style2.BackColor = Color.DarkBlue; gridControl1.DataRowTemplateStyles.Add( style1 ); gridControl1.DataRowTemplateStyles.Add( style2 ); | |
Or, you can customize the overall appearance of the grid using predefined stylesheets which can be accessed by right-clicking in the body of the grid and selecting the Apply style sheet menu or by using the verb in the property grid.
See code
| VB.NET |
Copy Code |
|---|---|
GridControl1.ApplyStyleSheet( Xceed.Grid.StyleSheet.Xceed )

' Because we called BeginInit at the beginning of the process

' we must call EndInit otherwise none of our modifications

' will be applied to the grid.

GridControl1.EndInit() | |
| C# |
Copy Code |
|---|---|
 gridControl1.ApplyStyleSheet( Xceed.Grid.StyleSheet.Xceed );

// Because we called BeginInit at the beginning of the process

// we must call EndInit otherwise none of our modifications

// will be applied to the grid.

gridControl1.EndInit(); | |

