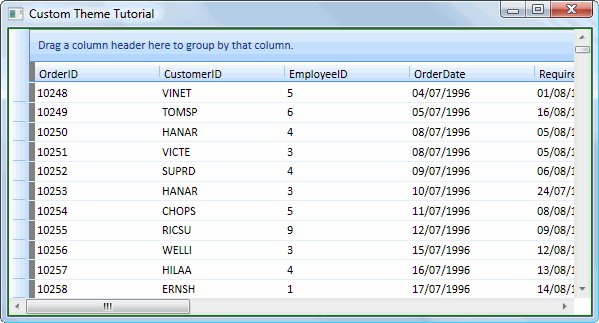

After all that styling and templating, you're probably anxious to use your new theme. This is the part you were waiting for.
Once compiled, the project you created in Part 1 creates an assembly, which will be imported into the application where you want to use it. Your theme's name, namespace, and assembly name are defined in the project settings. You will need this information before we continue. Go ahead, I'll wait...
OK, with your clipboard armed with your theme's information, follow the steps detailed below to use your theme. For those of you who are saying,
Ugh... show me the code already!
This first portion of code demonstrates how to retrieve data from the Orders table of the Northwind database. It also assumes that the Northwind database, which is installed (on Vista) in the "C:\ProgramData\Xceed Software", is included in the project within a Data folder. If you are not on Vista, searching for "Northwind.mdb" will locate the file.
This code should be placed in your App.xaml.cs or App.xaml.vb code-behind file.
| VB.NET |
Copy Code |
|---|---|
Imports System.Data.OleDb Imports System.Data Shared Sub New() Dim dataSet As New DataSet() Dim mdbfile As String = "Data\Northwind.mdb" Dim connString As String = String.Format("Provider=Microsoft.ACE.OLEDB.12.0; Data Source={0}", mdbfile) Dim conn As New OleDbConnection(connString) Dim adapter As New OleDbDataAdapter() adapter.SelectCommand = New OleDbCommand("SELECT * FROM Orders;", conn) adapter.Fill(dataSet, "Orders") m_orders = dataSet.Tables("Orders") End Sub Public Shared ReadOnly Property Orders() As DataTable Get Return m_orders End Get End Property Private Shared m_orders As DataTable | |
| C# |
Copy Code |
|---|---|
using System.Data.OleDb; static App() { DataSet dataSet = new DataSet(); string mdbFile = @"Data\Northwind.mdb"; string connString = String.Format( "Provider=Microsoft.ACE.OLEDB.12.0; Data Source={0}", mdbFile ); OleDbConnection conn = new OleDbConnection( connString ); OleDbDataAdapter adapter = new OleDbDataAdapter(); adapter.SelectCommand = new OleDbCommand( "SELECT * FROM Orders;", conn ); adapter.Fill( dataSet, "Orders" ); m_orders = dataSet.Tables[ "Orders" ]; } public static DataTable Orders { get { return m_orders; } } private static DataTable m_orders; | |
This XAML code simply adds a datagrid to a form and displays it in a table-view layout using the custom theme. This code should be placed in your Window1.xaml file and will use the Orders property created in the previous code example.
| XAML |
Copy Code |
|---|---|
<Grid xmlns:xcdg="http://schemas.xceed.com/wpf/xaml/datagrid" xmlns:theme="clr-namespace:Office2007Tutorial;assembly=Office2007Tutorial"> <Grid.Resources> <xcdg:DataGridCollectionViewSource x:Key="cvs_orders" Source="{Binding Source={x:Static Application.Current}, Path=Orders}"/> </Grid.Resources> <xcdg:DataGridControl x:Name="OrdersGrid" ItemsSource="{Binding Source={StaticResource cvs_orders}}"> <xcdg:DataGridControl.View> <xcdg:TableView> <xcdg:TableView.Theme> <theme:Office2007TutorialTheme/> </xcdg:TableView.Theme> </xcdg:TableView> </xcdg:DataGridControl.View> </xcdg:DataGridControl> </Grid> | |
See final result
