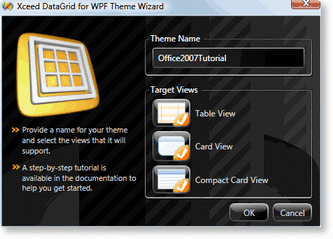
When you installed Xceed DataGrid for WPF, a project template for creating custom themes was added to Visual Studio's list of available projects types. So let's get started and create our custom-theme project.
- Open Visual Studio and select the File\New\Project menu to display the New Project window.
- Under Visual C# or Other Languages\Visual Basic, select the Xceed folder.
- In the Templates pane, select the WPF DataGrid Theme template.
- Enter the name, location, and solution name you want. For the purposes of this tutorial, I will be using Office2007Tutorial.
By default, the project's name is used as both the assembly name and namespace. If you provide a name other than
Office2007Tutorial some parts of this tutorial may not work; notably, when trying to use your custom-theme assembly in
part 5. In this case, you will need to make the necessary modifications to the examples demonstrated in part 5 to either use your assembly name and namespace, or change them in the project's properties.
- Press OK. The Create WPF DataGrid Theme dialog in which the views to support can be selected will be displayed. This custom theme will only support Table View so remove the Card View and Compact-card View target views.
- Press OK.
Once the project is open, you will notice a couple of files that have been automatically included. These files contain the styles and other various resources required by the theme. The following table provides a list of these files as well as their purpose:
| File |
What is it used for? |
| Office2007Tutorial.Resources.xaml |
Contains default values and resources that can be used by any view. |
| TableView.Office2007Tutorial.Graphics.xaml |
Contains various view-specific graphics that are used by the theme. |
| TableView.Office2007Tutorial.xaml |
Main entry point of your theme. All styles that are applied to the elements in a grid are defined in this file. |
| generic.xaml |
Contains various resources specific to the theme. There is no need to touch this file. |
| Office2007TutorialTheme.cs |
Class which defines the theme class, its name, as well as the views it supports. |
The default element templates are view dependent and are located in each view-appropriate grid-element template XAML file (e.g., TableView.GridElementTemplates.xaml). These files can be found in the common-theme folder located under the Xceed DataGrid for WPF installation folder in the Themes\Common folder. The default templates for the elements that will be re-templated will be retrieved from these files.
Naming Conventions
Each element has a style which is defined in TableView.Office2007Tutorial.xaml. These styles are identified by the name of each element's associated class preceded by the word "STYLE:". To locate a specific style, simply search for "STYLE: " followed by the class name (e.g., "STYLE: GroupByItem").
Templates, like styles are identified by the name of each element's associated class but preceded by the word "TEMPLATE: ". To locate a specific template, simply search for "TEMPLATE: " followed by the class name (e.g., "TEMPLATE: DataGridControl").
For those of you who dread searching for styles and templates, they will be included in this tutorial so they can be pasted directly into your custom theme.
Using Your Custom Theme
Most people like to see the result of their work as they are creating it. If this is your case, you can jump to part 5 which will take you through the necessary steps needed to use your custom-theme assembly in a working project. At any time, just recompile the theme assembly to see the results as you work.
Visual Studio Designer
Xceed DataGrid for WPF is not supported in the design-time surface of Visual Studio 2005; therefore, it is suggested that you always open datagrid-related XAML files with the XML editor. To make this your default setting when opening an XAML file:
- right-click on an XAML file in the project and select the Open With... menu option;
- select the XML Editor in the Open With dialog;
- click the "Set as default" button;
- and press OK.
This will prevent the designer from being used by default when an XAML file is opened.


