When an instance of the GenerateReportForm class is created and its ShowDialog member is called, end-users can access a form through which reports can be previewed, printed or exported. In addition, report styles can be applied to the report. Optionally, the Generate Report form can also allow end-users to create and manage their own report styles.
GenerateReportForm
Report styles encompass the various visual aspects of a report that can be modified, such as the color of the report elements, their spacing, etc. Report styles are listed in the Report Styles section of the Generate Report form.
Two versions of this form are available, created by two different versions of the class constructor. The first version takes a single argument, namely the GridControl instance from which the report will be generated.
| VB.NET |  Copy Code Copy Code |
|---|---|
Dim generateReport As New GenerateReportForm( Me.gridControl1 ) | |
| C# |  Copy Code Copy Code |
|---|---|
GenerateReportForm generateReport = new GenerateReportForm( this.gridControl1 ); | |
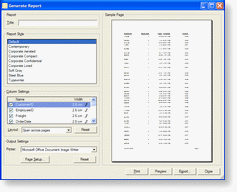
Using this version of the constructor creates the following form:
The Title field at the top of the form is used to specify the name of the report; this text is used in the %TITLE% variable. Variables are used in the report's page header and footer. See Using variables in page headers and footers for details.
The form lets the end-user choose a pre-defined report style from the Report Style area of the form. The end-user can also decide which columns should be included in the report by checking or unchecking them in the Column Settings area of the form. The width of these columns can also be modified.
The Layout dropdown menu in this section allows the end-user to select "Span across pages" or "Fit to page". The Reset button restores the default settings (visibility of columns, column width and Layout option).
The report can be printed, previewed or exported using the buttons to the lower right.
The second version of the constructor additionally specifies a folder in which custom report styles are stored. The report styles folder must exist. Otherwise, an exception will be thrown.
| VB.NET |  Copy Code Copy Code |
|---|---|
Dim generateReport As New GenerateReportForm( Me.gridControl1, "D:\Temp\styleFolder" ) | |
| C# |  Copy Code Copy Code |
|---|---|
GenerateReportForm generateReport = new GenerateReportForm( this.gridControl1,generateReport.ShowDialog(); | |
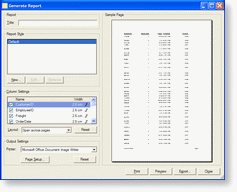
This code creates the following form:
Three additional buttons are available in this version of the Generate Report form, below the Report Style list box. The New, Edit, and Remove buttons let end-users manage report styles:
| Button | Desscription |
|---|---|
| New | Creates a new report style and opens the Customize Report Style form. For details see Using CustomizeReportStyleForm. |
| Edit | Opens the Customize Report Style form on the report style selected in the Report Style list box. For details see Using CustomizeReportStyleForm. Note that you cannot edit the “Default” report style. |
| Remove | Removes the report style selected in the Report Style list box, with confirmation. Note that you cannot remove the “Default” report style. |
Note: If you provide GenerateReportForm for your end-users, you should avoid using the ReportStyle properties of the various grid elements, as the latter always have precedence over the settings in this form. If you explicitly set any ReportStyle properties, the settings in the form will be overridden, and consequently it may not be clear to end-users why their settings are not used when the report is generated.
Report styles can also be accessed programmatically through the ReportStyleSheet property of the Report class, or through the ReportStyle properties of the grid's elements. The ReportStyle properties can also be modified directly in the Visual Studio Designer. For details, see Report styles and report style sheets.
Print, Preview and Export buttons
When any of these buttons is clicked, a report is generated using the style selected in the Report Style list box.
The Print button opens a standard Print dialog box used to print the report.
The Preview button opens a standard Print Preview dialog box that lets the end-user examine a report in its entirety (rather than just a sample page).
The Export button allows end-users to export the report in one of several formats. Exporting a report can be useful for example if you want to integrate it into a web page or send it to someone via email.
| Export Format | Page Format |
|---|---|
| Multi-page format. | |
| HTML | Continuous format. |
| JPEG | Single-page format. |
| TIFF | Multi-page format. |
TIFF and PDF files are multiple-page format files, meaning that all of the pages of the report being exported are included in a single file, but represented as individual pages. In HTML files, all of the report's information is presented in a single, continuous page.
GenerateReportForm source code
The C# source code for GenerateReportForm is provided for developers who wish to modify the form for their own applications. The Visual Studio 2003 project is available in the [Program Files]\Xceed\Xceed Grid for WinForms [version]\Custom Forms folder.
To use a modified version of the GenerateReportForm, developers must recompile the Xceed.Grid.Reporting.ReportConfigForms project, and include the generated assembly in their project. This assembly must then also be distributed along with the compiled version of their application.

